
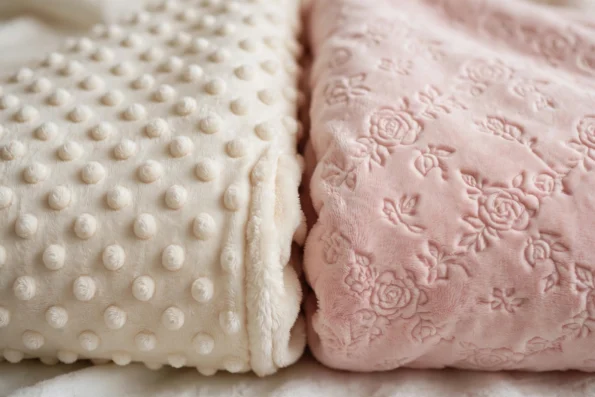
Cream Minky Dot fabric with raised dots beside blush Minky Rosebud fabric with embossed roses

Minky Dot vs Minky Rosebud: Which Plush for Baby Blankets?

Two minkys, one decision: dots or rosebuds? If you have ever held a piece of minky, you know why it is the first fabric parents reach for when a baby blanket is on the list. It is a plush polyester fabric with a short, dense pile and a famously silky hand — like stroking a stuffed animal. But walk into the minky aisle and you face a choice that stops a lot of makers: Minky Dot or Minky Rosebud? Both are the same soft minky underneath, both are 60 inches wide and sold by the yard, and both make beautiful baby blankets. The difference is the texture on the surface — and that texture changes how the blanket feels, how it looks, and which projects each one suits best. What Minky Dot is Minky Dot is minky with a raised dot texture pressed into the pile — small, soft, evenly spaced dots that you can feel as well as see. The dots give the fabric a playful, modern look and a gently bumpy hand that babies love to touch. It is the minky you see most often on baby blankets, loveys and nursery décor, because the dot pattern reads as cheerful and young without needing a print. Minky Dot is the more forgiving of the two to sew. The dot texture hides small imperfections — a slightly wobbly seam or a pin mark disappears into the pattern — and the dots give you a visual guide when you are cutting straight lines. It is also the better choice when the blanket is for a gift where you do not know the nursery colours yet: the dot pattern is gender-neutral in a way a floral pattern is not. What Minky Rosebud is Minky Rosebud has a delicate embossed floral pattern — tiny rosebuds pressed into the pile instead of dots. The effect is softer and more romantic: the rosebud pattern appears up close, while from a distance the fabric reads as plain minky with a gentle sheen. It is the minky for a classic, pretty baby blanket, a christening gift, or a nursery with soft, traditional styling. Rosebud minky feels slightly smoother under the hand than dot minky, because the embossed flowers sit flatter than the raised dots. That makes it the better choice for a blanket that will be against a baby’s cheek all night, or for a lovey that a baby will rub between their fingers. Softness, pile and feel compared Underneath the pattern, both fabrics are the same plush minky: the same short, dense pile, the same silky hand, the same warmth. Neither is objectively softer — the difference is in the surface. Minky Dot feels gently bumpy and tactile, which babies find interesting to touch; it is the sensory option. Minky Rosebud feels smoother and flatter, which some parents prefer for a sleeping blanket because there is nothing raised to rub against delicate skin. Both fabrics shed when cut — minky always does — so expect a little fluff on your cutting table and your clothes. A quick shake outside and a lint roller solve it, and the shedding stops once the blanket is sewn and washed. Our Minky vs Faux Fur guide explains how minky compares with the other plush fabrics if you are still weighing your options. Best uses: which blanket for which baby? Choose Minky Dot when the blanket is for play, for a gift where you want a cheerful look, or for a nursery with modern, bold colours. Choose Minky Rosebud when the blanket is for sleep, for a christening or a first-birthday gift, or for a nursery in soft pastels and classic styling. Both make excellent baby blankets, and both work for the same projects beyond blankets: loveys, stroller blankets, car-seat covers, nursery cushions and soft toys. The deciding question is not which is better — it is which feeling you want. Dots are playful; rosebuds are pretty. If you genuinely cannot decide, order a yard of each from the Minky & Fleece collection and let the baby decide — babies are very clear about which texture they prefer. How much minky do you need? Because both minkys are 60 inches wide, one yard makes a generous baby blanket and 1.5 yards makes a large toddler blanket. A lovey needs only half a yard. If you are backing the minky with a second fabric — cotton flannel is the classic choice — buy the same length of backing so the two layers match. Our Minky vs Fleece for baby blankets guide has more on choosing the right backing and weight. Sewing tips for both minkys Minky is famously slippery, and the two textures behave slightly differently under the machine. Minky Dot grips a little better because the dots give the presser foot something to hold; Minky Rosebud is smoother and more likely to creep, so pin it more closely — every 5 cm rather than every 10. Use a ballpoint needle, a longer stitch length of 3 to 3.5 mm, and a walking foot if you have one. Sew with the minky on the bottom and the backing on top, so the feed dogs grip the slippery side. Cut minky from the back with a rotary cutter, and cut with the pile running the same way on every piece. Expect shedding: cut outside if you can, or lay newspaper under the fabric and shake it out afterwards. And never iron minky directly — the pile melts under heat. If you must press a seam, use a cool iron and a pressing cloth, or simply finger-press. Washing and care Both minkys wash the same way: cool or warm water, gentle cycle, mild detergent, and no fabric softener. Tumble dry on low or hang to dry — high heat damages the pile on both. The dot texture and the rosebud embossing are pressed into the fabric rather than printed on it, so they do not fade or wash out; the rosebud pattern softens
CONTINUE READING ➞
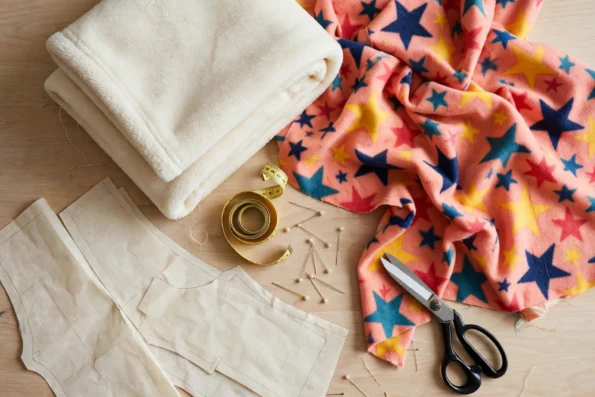
Folded cream anti-pill fleece beside star-print polar fleece with dressmaking shears, measuring tape and pins

How to Sew a Fleece Blanket: Cutting, Seaming and Finishing

A fleece blanket is the easiest first sewing project there is A fleece blanket is the project most sewists start with, and for good reason. Fleece does not fray, so there are no raw edges to finish before you begin. It is forgiving under the machine, it stretches just enough to hide a wobbly seam, and a finished blanket is useful from the moment it comes off the table. If you can sew a straight line, you can sew a fleece blanket in an afternoon. Here is the whole process: choosing the fleece, cutting it square, seaming it, and finishing the edges so it looks shop-bought. Choose the right fleece first Not all fleece behaves the same, and the choice you make at the cutting table decides how the blanket looks after twenty washes. For a blanket that will be washed week after week, start with Anti-Pill Polar Fleece. Anti-pill fleece is treated to resist the little bobbles that form on ordinary fleece, so the blanket stays smooth and new-looking far longer. It washes well, dries quickly, and comes in solid colours that suit a calm, grown-up throw as well as a child’s blanket. If the blanket is meant to make someone smile, Printed Polar Fleece is the fun option: 100% polyester fleece, 60 inches wide, in 101 prints — dinosaurs, stars, florals, camo, hearts and novelty designs. The prints stay bright wash after wash, and a single yard already covers a good-sized throw panel. Both fleeces are sold by the yard and cut in one continuous piece, so a long blanket arrives without joins. You can browse the whole Anti-Pill Fleece collection to compare solid colours before you decide. How much fabric do you need? Fleece blankets are cut to the size of the person, not the size of the pattern. A baby blanket needs about 1 yard. A child’s blanket or a lap throw takes 1.5 to 2 yards. A full throw for an adult on the sofa takes 2 to 3 yards, and the printed fleece listing itself notes that two to three yards is plenty for a child-sized blanket. Because fleece is 60 inches wide, one width is usually enough — you rarely need to join two panels the way you would with narrower fabric. Our yardage guide has the full table if you are cutting for a bed rather than a sofa. Cutting: square it up before you cut anything else Fleece stretches, and a blanket cut on the skew will never lie flat. Lay the fabric out on a clean floor or a large table, smooth it flat without pulling, and square the ends first: fold the fabric in half lengthwise, match the selvedges, and trim the cut ends straight across with a rotary cutter and a long ruler. A rotary cutter is worth using here — scissors drag fleece and leave a wavy edge, while a sharp rotary blade glides through both layers at once. Cut with the nap running the same way on every piece. Fleece has a slight direction to its pile, and two pieces cut in opposite directions will look like two different colours in the light. If you are making a double-layer blanket, cut both layers together so they match exactly. Seaming: three ways to build a blanket There are three good ways to build a fleece blanket, and the right one depends on how much sewing you want to do. A single-layer blanket is the fastest: one piece of fleece, hemmed all round. A double-layer blanket — two pieces sewn wrong sides together and turned — is warmer, heavier and looks finished on both sides; use it for winter throws and gifts. A no-sew tie blanket, where the two layers are knotted together through a fringe, needs no machine at all and is the classic classroom and charity project. Whichever you choose, use a ballpoint or stretch needle and a slightly longer stitch than you would for cotton — around 3 to 3.5 mm. A universal needle can skip stitches on fleece, and a short stitch length puckers the seam. Sew with a straight stitch for the main seams. Pin generously, or use wonder clips — pins disappear into fleece pile and are easy to sew over by accident. The double-layer method, step by step Place the two pieces right sides together and pin all round, leaving a gap of about 15 cm on one side for turning. Sew around the edge with a 1 cm seam allowance, backstitching at the start and the end of the gap. Trim the corners at an angle, turn the blanket right side out through the gap, and push the corners out with a blunt tool — a chopstick works well. Finger-press the edge, then topstitch all round about 5 mm from the edge. The topstitching closes the turning gap and stops the layers shifting in the wash. Finishing the edges so it looks shop-bought The edge is what separates a homemade blanket from a handmade one. The simplest good finish is a folded hem: fold the edge under by 1 cm, then again by 2 cm, pin, and topstitch. The double fold hides the cut edge completely and gives the blanket a little weight at the border. For the most polished result, bind the edge. Fold a strip of contrast fleece, satin or cotton over the raw edge and stitch it down on both sides. Binding is the finish to choose for a gift blanket: it frames the print, it covers any uneven cutting, and it wears better than a plain hem. Our winter blanket fabrics guide compares fleece with minky and flannel if you are still deciding which fabric your blanket should be made from. Care: keeping a fleece blanket soft Fleece is one of the easiest fabrics to care for, which is half the reason it makes such a good blanket. Wash it in cool or warm water on a gentle cycle, and skip the fabric softener —

CONTINUE READING ➞
My Cart
Wishlist
Recently Viewed
Categories

SPIN TO WIN!

  • Try your luck to get a discount coupon
  • 1 spin per email
  • No cheating
Try Your Lucky
Never
Remind later
No thanks