
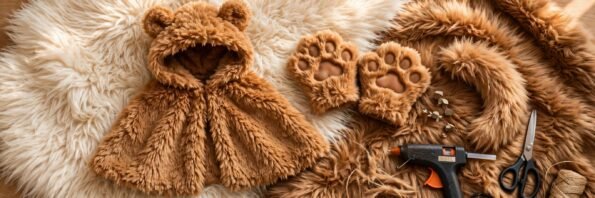
How to Make a No-Sew Faux Fur Halloween Costume
You want a furry animal Halloween costume — a bear, a wolf, a lion — but you do not own a sewing machine, you cannot sew a straight seam, and Halloween is only days away. Here is the good news: faux fur is one of the most forgiving fabrics you can work with. With a glue gun, a craft knife, and a little patience, you can build a complete, cozy, convincing animal costume without threading a single needle. This guide walks you through a no-sew faux fur Halloween costume built from a long-pile shaggy fur: an ears hood, a simple cape, a swishy tail, and soft paw mittens. Two to three hours of relaxed crafting and you will have a costume that looks store-bought. If you are still deciding what to be, our guide to the best fabrics for Halloween costumes has more animal-costume inspiration. What You Need for a No-Sew Fur Costume The star of the show is a long-pile fur. The Faux Fur Shaggy Fabric at ValentinaTextile.com is 100% polyester with a thick, realistic shaggy pile, 60 inches wide, sold by the yard in continuous cuts. Pick your animal color: brown or camel for a bear, black for a wolf, white or ivory for an arctic fox, orange for a fox. 2 to 3 yards of Faux Fur Shaggy Fabric by the Yard — 2 yards for a child, 2.5 to 3 for an adult Hot glue gun with glue sticks, plus flexible fabric glue as a backup Sharp craft knife or box cutter — not scissors, which crush the pile Measuring tape, chalk or a fabric marker A plain hoodie in a matching color, the no-sew skeleton of the costume Stiff cardboard or craft foam for the ear inserts, and ribbon for neck ties Faux fur does not fray, so every edge is already finished — that is why zero sewing works. Step 1: Measure and Plan Decide your animal and lay the hoodie flat. Measure head circumference (hood), shoulder to waist (cape), wrist to mid-forearm (paws), and waist to mid-thigh (tail). Sketch each piece — ears, cape, two paws, tail — before cutting. Check the nap direction: brush the fur to see which way it lies flat, and mark an arrow on the backing of each piece so the pile runs downward everywhere. Matching nap direction is what makes the costume look like real fur instead of patchwork. Step 2: Cut the Faux Fur — Always from the Back Lay the fabric fur-side down, mark lines on the woven backing with chalk, and slice only the backing with light, repeated craft-knife strokes — never saw through the pile. Cutting from the back keeps every long fiber intact, so edges look full instead of chopped blunt. Cut two rounded ear triangles about 4 inches wide, one cape rectangle as wide as your shoulders and as long as your cape measurement, one tail strip about 5 inches wide, and four hand-size paw rectangles. Shake each piece outdoors to release loose fibers before bringing it inside. Step 3: Build the Ears Hood For each ear, sandwich a slightly smaller cardboard triangle between two fur triangles (fur sides together) and glue the two long edges, leaving the bottom open. Turn right-side out, fold the bottom edge under, and glue shut — the cardboard gives the perky stand-up shape. Glue the ears to the crown of the hoodie hood, pressing 30 seconds each, and fluff the surrounding pile over the joins so the seams disappear. Cover the hood back and sides with fur panels, trimming around the face opening. The ears should stand upright, framing the face like a mane. Step 4: A Simple Cape Body Drape the fur rectangle over your shoulders, pile running down, and mark where it meets each hoodie shoulder. Glue along each shoulder seam and press the cape down until set — it now moves with you and will not slip. Fold the top two inches inside and glue for a clean collar edge, then glue a 12-inch ribbon to each front corner and tie under the chin. Prefer a vest? Cut the rectangle in half for front panels, glue them to the hoodie shoulders and sides, and lace the front with ribbon. Step 5: Tail and Paw Mittens Fold the tail strip lengthwise, fur out, and glue the long edges together from the back in short sections. Leave one end open, stuff lightly with fabric scraps or fiberfill, glue shut, and pin to the lower back with a large safety pin — secure and removable for storage. Trace each hand onto the fur backing with an inch of margin and cut two pieces per hand. Glue around fingers and sides, leaving the wrist open; check fit before the glue sets. Glue small contrasting ovals on the palms as toe beans — our no-sew felt Halloween crafts post has ideas for details like these. Step 6: Glue and Finish the Hems Fold every raw edge under half an inch and glue in short sections, pressing the backing flat so no glue shows. Work the cape hem, mitten wrists, and tail base; use fabric glue on flexible spots like cuffs for a softer bond. Trim uneven fibers at the hems, brush all pile downward, and the costume is done. Care and Storage Tips Spot clean with a damp cloth or dry clean only, and shake gently after wearing to restore the fluff. Never bleach; keep hot irons away from the polyester pile. Hang the costume in a breathable garment bag between Halloweens — compressed fur creases. Brush before each wearing to keep the shaggy pile wild and full. Ready to Make Your No-Sew Fur Costume? Start with the right fur. Shop the Faux Fur Shaggy Fabric by the yard at ValentinaTextile.com — 60 inches wide, long plush pile, sold in continuous cuts — or browse the full faux fur collection to compare colors for your animal. Order today and you can be cutting, gluing, and trying